 |
The character-based interface, atac, accepts various command-line options that specify various display selection choices besides accepting one or more .atac and .trace files as input. atac compares what should be covered in a given source file to what has been covered and outputs its findings in a variety of ways. Unless invoked in summary report generation mode (with the -s, -C, -H, -T, or -v command-line options; see Chapter 8, ATAC: Generating Summary Reports), atac outputs the results of its analysis in the display mode. Source code fragments are paged across the screen and uncovered testable attributes are highlighted in reverse video. Additional arguments are used to further specify precisely which testable attributes are displayed. For a synopsis of atac usage, see its command reference page in Appendix B.2, atac.
	prompt:> wordcount -?
	prompt:> wordcount -bad_option
	prompt:> wordcount no_such_file
	prompt:> wordcount empty
Now all uncovered testable attributes can be displayed using the character-based interface by entering:
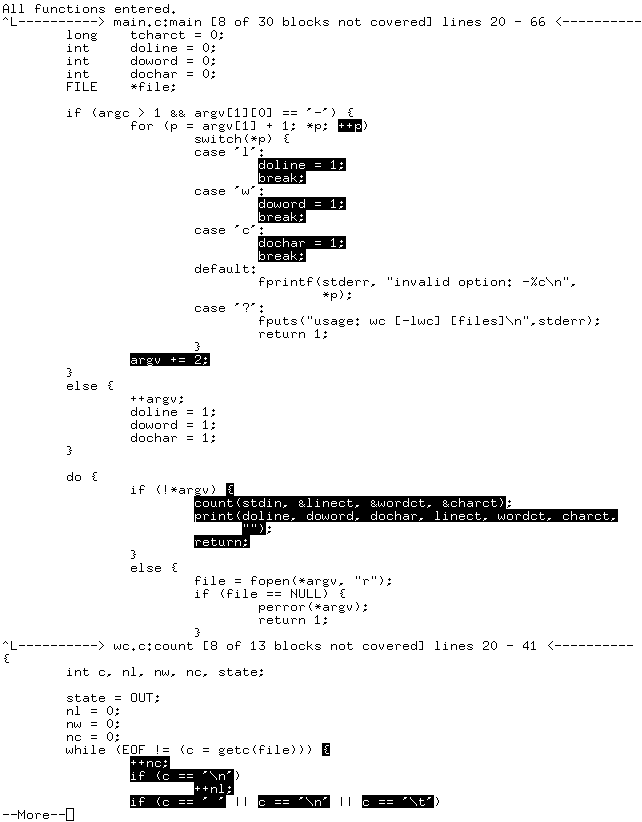
prompt:> atac main.atac wc.atac wordcount.traceThe beginning part of the display generated appears in Figure 9-1. The first line of the display informs the tester that function-entry coverage has been completely satisfied. This line is followed by a code fragment highlighting the eight remaining uncovered blocks in the file main.c followed by some of the remaining uncovered blocks in the file wc.c (recall that a function call ends a block). Additional information follows in the display, but the output appears one page at-a-time, so the tester can study it while developing test cases.
|
|
In the graphical user interface, ATAC, on the other hand, the display selections are made by clicking appropriate menus and selecting relevant entries with the help of the mouse.The .atac and .trace files may be specified either on the command line or added later during a ATAC session. Refer to Chapter 2, ATAC: A Tutorial for more explanation. Figure 9-2 shows the result of invoking ATAC (after moving a few lines down) using the following command:
prompt:> xatac main.atac wc.atac wordcount.trace
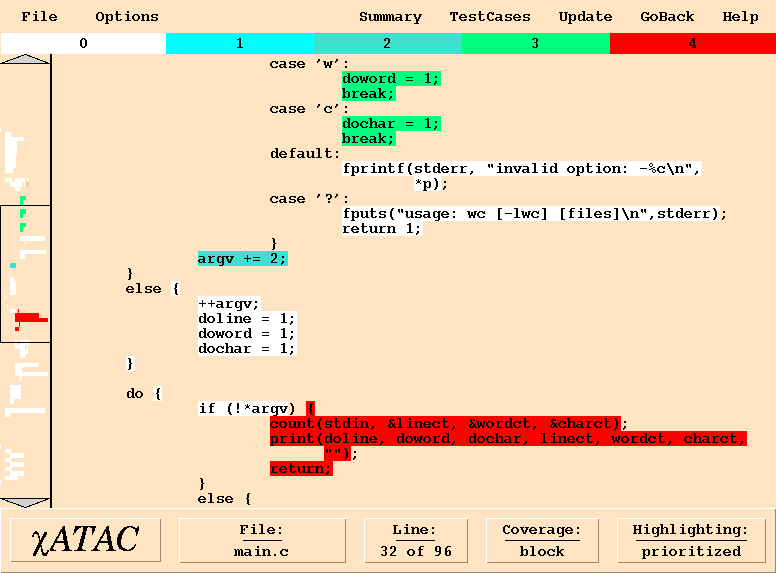 |
The color spectrum chart above the source window displays the actual weights associated with each color. The annotated scroll bar to the left of the source window displays a thumbnail sketch of the entire file. It is very useful in quickly locating where the red blocks, or the ``hot spots,'' in the file are. Clicking with the left mouse button at any spot in the scroll bar brings the corresponding region of the file into the source window. The arrows at the top and the bottom of the scroll bar may be used to scroll up or down the source file a few lines at a time. Alternatively, the mouse may be dragged up or down the scroll bar with the left mouse button pressed to rapidly scroll through the file.
Test cases may be run in parallel to a ATAC session. Running a test case causes new coverage information to be logged to a .trace file. ATAC continuously monitors the specified trace files to see if any new coverage information has been added to any of them. If so, it highlights the ``Update'' button in the top button bar to alert the tester to this fact. The tester may then choose to click on this button to incorporate the new coverage information in the display, or wait to do so until several other test cases have been run.
prompt:> atac main.atac wordcount.traceThe graphical interface, on the other hand, always displays one source file at a time even when multiple .atac files are specified on the command line. By default it displays the source file that corresponds to the first .atac file on the command line, as mentioned earlier. A different source file may be displayed by clicking on the ``Summary'' button in the top button bar and then selecting the ``by-file'' option. For each .atac file specified on the command line, ATAC lists the corresponding source file in this window. This list can be sorted in different ways. Clicking on ``Sort_by'' in the middle button bar and selecting the ``name'' entry will sort files by name in alpha-numeric order. The ``num_covered,'' ``percentage_covered,'' ``num_uncovered,'' and ``percentage_uncovered'' entries sort files by the number or percentage of testable attributes covered or uncovered, respectively, according to the currently selected coverage type. The entry ``num_total_units'' sorts files by the total number of testable attributes with respect to the currently selected coverage type. The ``default_order'' selection performs the sort according to the order the .atac files occurred on the command line; and the entry ``dont_sort'' preserves the current state of the sort allowing new information to be appended to the end.
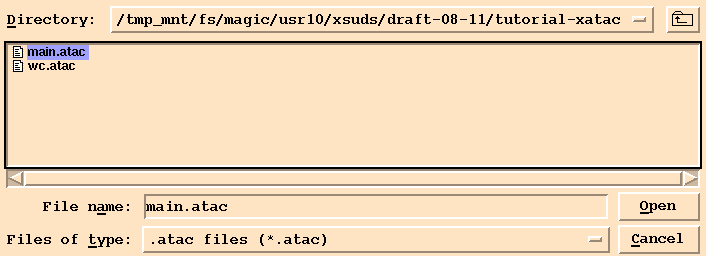
A new file that is not listed may be added to the summary window and displayed by clicking on the ``open .atac or source file . . .'' entry in the ``File'' menu and specifying the name of the corresponding .atac file in the dialog box that pops up as shown in Figure 9-3 (the Windows dialog box looks slightly different).
 |
|
|
prompt:> atac -F main -F count main.atac wc.atac wordcount.traceNote that multiple functions may be specified by repeating the -F option and these functions must be defined within the .atac files listed on the command-line. Functions may be named using wild card characters. These wild cards are the same as those used by the UNIX-like command processor in naming files (*, ?, [...]). In some cases, quote marks may be needed to prevent the command processor from expanding the function names containing wild cards as file names.
The graphical interface, as mentioned earlier, always displays an entire source file in the source window that the user can browse through using the scroll bar. Therefore there is no direct way of limiting the source display to certain functions in the graphical interface. Selecting the ``by-function'' option in the ``Summary'' window and then clicking on a particular function name, say, main.c:main, makes function main in main.c appear in the source window. However, this does not prevent another function, print in our case, in main.c (i.e., main.c:print) from being displayed in the source window even though it may be hidden due to the size of the source window. Nevertheless, you can still view the function print by browsing through using the scroll bar.
Functions listed in the ``Summary'' window can be sorted in different ways. Clicking on ``Sort_by'' in the middle button bar and selecting the ``name'' entry will sort functions by name in alpha-numeric order. The ``num_covered,'' ``percentage_covered,'' ``num_uncovered'' and ``percentage_uncovered'' entries sort functions by the number or percentage of testable attributes covered or uncovered, respectively, according to the currently selected coverage type. The entry ``num_total_units'' sorts functions by the total number of testable attributes with respect to the currently selected coverage type. The ``default_order'' selection performs the sort according to the order of .atac files on the command line; and the entry ``dont_sort'' preserves the current state of the sort, allowing new information to be appended to the end.
Clicking with the right mouse button on a function label that is currently selected deselects it, and vice versa. Clicking with the left mouse button on ``Disable'' and selecting the ``Disable all functions'' entry will deselect all functions, whereas the ``Enable all functions'' entry will re-select all functions.
Function names in the ``Summary'' window can be displayed with or without the corresponding file name. Clicking with the left mouse button on ``file_name'' and selecting the ``include file name'' entry will have the file name included, whereas the ``exclude file name'' entry excludes the file name.
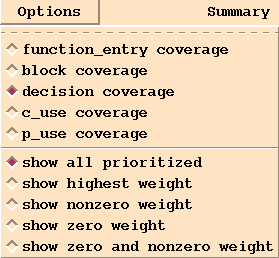
prompt:> atac -md main.atac wc.atac wordcount.traceIn ATAC, the desired coverage type may be specified by clicking on the ``Options'' button in the top button bar and selecting the corresponding coverage type in the top half of the menu that pops up, as shown in Figure 9-4.
 |
|
|
prompt:> atac -n wordcount.1 -n wordcount.2 main.atac wc.atac wordcount.trace
Notice that multiple -n arguments may be submitted on a single command-line. In such a
case, the union of all the tests named is selected. Tests can also be named using wild card
characters. These wild cards are the same as those used by the UNIX-like command
processor in naming files (*, ?, [...]). So, entering:
prompt:> atac -n 'wordcount.[1-2]' main.atac wc.atac wordcount.trace
results in the same listing as the previous example. In some cases, quote marks may be
needed to prevent the command processor from expanding the test names as file names.
prompt:> atac -x -n 'wordcount.[1-2]' main.atac wc.atac wordcount.trace
displays any testable attributes not covered by the third and fourth test cases, excluded from
the output in the previous examples.
As in the character-based interface, the graphical interface also takes all test cases into consideration by default while determining any uncovered testable attributes (see Figure 9-5). Clicking with the right mouse button on a test case label that is currently selected deselects it, and vice versa. Clicking with the left mouse button on ``Disable'' and selecting the ``Disable all tests'' entry will deselect all tests, whereas the ``Enable all tests'' entry will re-select all tests. The entry ``Disable zero coverage tests'' will disable tests which do not contribute any coverage with respect to the currently selected coverage type.
 |
Tests listed in the ``TestCases'' window can be sorted into different orders. Clicking on ``Sort_by'' in the middle button bar and selecting the ``name'' entry will sort tests by name in alpha-numeric order. The ``num_covered'' entry sorts tests by the number of testable attributes covered with respect to the currently selected coverage type. The entry ``default_order'' sorts tests according to the order in which they were executed, and the entry ``dont_sort'' preserves the current state of the sort, allowing new information to be appended to the end.
You can force the display of all uncovered testable attributes, whether they are covered by a weaker measure or not, using the -a command-line option. For example, assume the four tests presented at the beginning of this chapter have been executed against the wordcount program. Enter the following to force the display of all uncovered testable attributes:
prompt:> atac -a main.atac wc.atac wordcount.traceThe graphical interface, on the other hand, always displays all uncovered testable attributes whether or not the corresponding weaker measures are covered. This is because, unlike the character-based interface, ATAC displays all covered and uncovered attributes ``in place'' in the source file and ignoring uncovered attributes not covered by a weaker measure will not reduce the size of the output the user has to scroll through.
You can cause the character-based interface to use underscoring, rather than highlighting, using the -u command-line option. For example, a display similar to that in Figure 9-1, except using underscoring, is generated by entering:
prompt:> atac -u main.atac wc.atac wordcount.trace > myfileand then viewing the contents of myfile. The output may also be sent directly to a printer, allowing easy generation of hard copy coverage displays.