 Slice: A Tool for Program Debugging
Slice: A Tool for Program Debugging
Slice: A Tool for Program Debugging
Slice is the program debugger in the Toolsuite. It automates many tedious tasks that developers otherwise must perform manually while debugging their code. Slice helps developers to focus on just the relevant code by eliminating the typical conceptual clutter of debugging. It makes the relevant pieces of the code stand out in no time with its intelligent analysis and state-of-the-art graphical interface.
In general, program slicing can be categorized as static slicing and dynamic slicing. A static slice is a set of statements of a program which might affect the value of a particular output or the value of a variable instance; whereas a dynamic slice is the set of statements which did affect the value of the output upon execution of a particular input. A dynamic slice with respect to the output variables gives us the statements that are not only executed but also have an impact on the program output under that test case. Although both static and dynamic slices can be used as an abstraction to help programmers in locating faults, a static slice is less effective because it, in general, requires that a larger portion of program code be examined than does a dynamic slice.
Collecting dynamic slices may consume excessive time and file space. Slice computes an execution slice instead. An execution slice is the set of statements executed under a test case. Since not every statement that is executed under a test case has an effect on the program output for that test case, some statements in an execution slice may not be in the corresponding dynamic slice. This makes an execution slice a super set of a dynamic slice. Based on execution slices, Slice also computes an execution dice which is the set difference of two execution slices. In Slice, an execution slice is the set of a program's blocks, decisions, c-uses or p-uses executed by a test input. Similarly, an execution dice is the set of blocks, decisions, c-uses or p-uses in one execution slice which do not appear in the other execution slice.
The strategy for fault localization in Slice is as follows. Suppose a piece of software has worked successfully for some time, so many error-free test cases are available. Then a problem is reported from the field with a new test case that exhibits a failure. The fault will be in the execution slice of the new test that exhibits the failure. It seems likely that the fault is not in the execution slices of the similar tests that do not exhibit the failure. We refer to the error-free test cases as successful tests and those that cause a failure as failed tests. A good starting point for locating the fault is to look at code that is in the failed execution slice but not in the successful ones, i.e., the execution dice obtained by subtracting the successful execution slices from the failed execution slice. Code in the resulting dice is highlighted in red as the most likely location of the fault. Code in the failed execution slice but not in the dice is highlighted in a different color with its likelihood of containing the fault inversely proportional to the number of successful tests which also execute it.
Execution dices obtained depend on the test cases used. Different dices may be generated by different sets of successful and failed tests. In order to have the best results one should try to identify successful tests that are as similar as possible to the failed tests in order to filter out as much irrelevant code as possible.
After the compilation, two .atac files (main_err.atac for main_err.c and wc.atac for wc.c)
and two executables wordcount(.exe) and wc_err(.exe) are created. Note, one .atac file is
created for each instrumented .c file, i.e., the .c files compiled with the ATAC compiler.
prompt:> wc_err input1 (wc_err.1)This should produce the following output:
		1	4	19	input1
		1	4	19	total
Repeat the same test with wordcount. The same output is generated which implies that test wc_err.1 does not distinguish the behavior of wc_err from that of wordcount. Hence, it is a successful test.
We now run the second test on wc_err by entering:
prompt:> wc_err -w input1 (wc_err.2)The output looks like:
		4	input1
		4	total
This is the same as that obtained from executing:
prompt:> wordcount -w input1This implies that test wc_err.2 is another successful test.
Let us run another test by:
prompt:> wc_err -w <input1 (wc_err.3)An output with an empty line is generated. Executed on wordcount, the same test produces the following output:
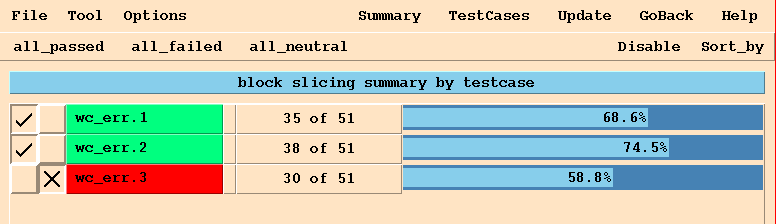
4This output differs from that generated by wc_err indicating test wc_err.3 is a failed test. So far, we have run three tests. On two of them wc_err and wordcount produce the same outputs, whereas on the third test different outputs are observed.
Next, we invoke the graphical user interface of the Toolsuite by entering the following command:
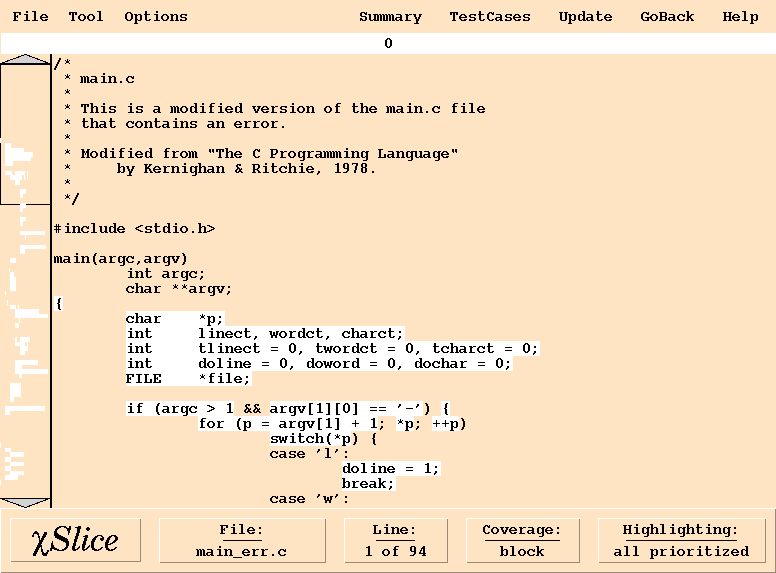
prompt:> xsuds main_err.atac wc.atac wc_err.traceThen pull down the ``Tool'' menu and select the ``xslice'' option. Figure 13-1 shows the main window of Slice.
 |
 |
 |
As discussed in Section 13.1, code in the execution dice is highlighted in red as the most likely location of the fault. Code in the failed execution slice but not in the dice is highlighted in a different color with its likelihood of containing the fault inversely proportional to the number of successful tests which also execute it. In our case, code in red with the highest priority 3 is executed by the failed test (wc_err.3) but not the successful tests (neither wc_err.1 nor wc_err2). Code with a priority 2 is executed by the failed test (wc_err.3) and one of the successful tests (either wc_err.1 or wc_err.2). Code with a priority 1 is executed by the failed test (wc_err.3) and both successful tests (wc_err.1 and wc_err.2). Finally, code in white with a priority 0 is the code that is not executed by any of the failed tests (wc_err.3, in our case). Note that only those pieces of code that are executed by all of the failed tests get a nonzero priority (i.e., are highlighted in non-white colors). However, if the program under test has multiple faults with each detected by different tests, you should try to locate one fault at a time. That is, while computing the execution slice or dice, do not select failed tests from different faults at the same time. Otherwise, the highlighted code will miss some of the faults. Those pieces of code that are not executed by any of the failed tests get a priority of zero (i.e., are highlighted in white) irrespective of whether or not they are executed by any (or some, or all) successful tests.
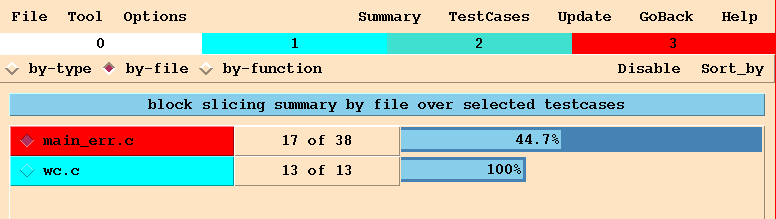
The highest priority among all pieces of code in a file gets reflected in the corresponding entry in the summary window. As in Figure 13-3, main_err.c is in red because some of its code has a priority 3, but the highest priority wc.c has is 1, so it is displayed in the color of priority 1. In other words, main_err.c (but not wc.c) has blocks that are executed by the failed test (wc_err.3) but not the successful tests (neither wc_err.1 nor wc_err.2). Click on main_err.c, as it contains the most likely location of the fault.
The source code of main_err.c with the red spot selected is displayed in Figure 13-4. The scroll bar is a thumbnail sketch of the entire file indicating there is one red spot. Clicking with the left mouse button at the spot in the scroll bar brings the corresponding region of the file into the source window. You can use the arrows at the top or the bottom of the scroll bar to scroll up or down the source file a few lines at a time. You can also drag the mouse up or down the scroll bar with the left mouse button pressed to rapidly scroll up or down the file. In addition, Slice also provides keyboard shortcuts. Pressing the Up or Down arrow key will move the file up or down one line at a time. The PageUp and PageDown keys scroll up and down the file one page at a time, respectively. The Home key scrolls to the beginning of the file, whereas the End key goes to the end of the file.
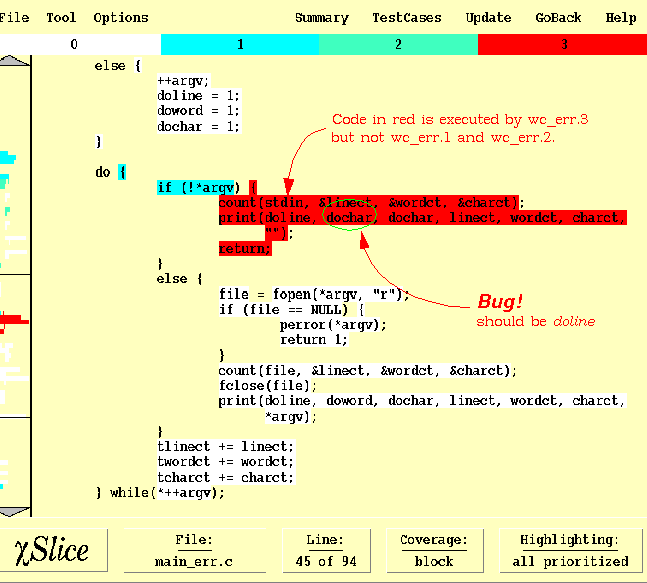 |
Analysis of the code in Figure 13-4 reveals that the blocks highlighted in red contain the fault. With the help of Slice and a careful selection of the successful and failed tests, this example shows that program maintainers can quickly locate faults by examining a reduced set of code instead of the entire program.